
Elise kind of got the shaft last year when it came to my handmade Christmas gifts. I only managed to squeak out a couple of small items (crayons and a matching game). I finished the playroom in late December/early January, so I made that count toward my self-imposed challenge for both her and Dan.
This year, I wanted to make her something a little larger (and that I could actually wrap).

Before
Remember this beauty I picked up at a thrift store on half price day?
It was only $1.46, so although it was quite ugly on the surface, I couldn’t pass it up. That scalloped roof had to be saved! It was in need of an Ugly Craft Makeover badly.

Before
I should mention that this was originally a mass-produced piece, but then someone tried to repaint it with an 80s country blue and did a horribly sloppy job of it.

I started by tearing the thing apart. I peeled off those louvered shutters flanking the upper opening. Then I ripped out all of the fabric that was on the back. That was the step that took the most time (like, maybe an hour!). There was also a hidden wind-up music box in the top opening, which I also removed.

The bottom surface had a couple of holes in it (for what, I’m not sure), so I filled them with wood filler and sanded them smooth. Then I sanded the whole thing with a fine grit sandpaper and wiped it off with multiple antibacterial wipes. Seriously, this thing was filthy.

Then it was time to paint. I spray painted it with Valspar’s white in a satin finish. Already looking like a thousand time better, no?

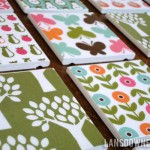
I decided to decoupage some fabric to the backs of the “rooms.” In some ways, using fabric is easier than using paper. It doesn’t tear and you can peel it up while it’s still wet and re-position, if necessary. I rooted through my stash for small scraps (you might recognize some of them from past projects!) and arranged them in a way I found pleasing.

I rough cut some pieces slightly larger than my openings, applied Mod Podge to the fabric and let them dry. (More details about how to decoupage with fabric in this earlier post.)

Then it was time to trim the fabric to size. Every cubby had different dimensions, so I measured each one carefully and cut every scrap to the right size.

I did a “dry fit” before Mod Podging them in place, inserting all of the fabrics to make sure nothing needed to be trimmed further. Once everything looked good, I Mod Podged them in place and when they had dried, I put another coat of Mod Podge on top of the fabric to seal it.

There was a small hole above the arched opening that was for the music box I removed. But the music box made the house top heavy and I didn’t want to put it back in.

So I swapped out the heart attached to the music box for another heart cutout to cover up the hole. It’s cutesy, but it works. I painted it pink and hot glued it in place.

And the transformation was complete! I’m not sure even this side-by-side conveys the difference in the before and after. The before was so dirty and gross, I’m surprised it didn’t get trashed before I found it.

And what’s even better is that since I used fabric scraps, the whole project cost around $7 (the house + a can of spray paint).


So who’s going to live in this house, you ask? Check back tomorrow for another post on that, but I’ll give you a sneak peek now.


So cute! And you’d never guess it was that inexpensive. It looks like something from a high-end toy store. Adorable.
It’s one of my secret abilities to take junk and make it look expensive. Thanks, Kirsti!