I have to laugh every time my husband takes a trip to the library with a teetering stack of books, DVDs and CDs in his arms. I’ve been telling him for months that a bag would make things much easier, but, you know, still no bag. I decided to make things easier for him and just make him a dedicated library bag. And then the best idea of all came to me: I had to make him a TARDIS bag.

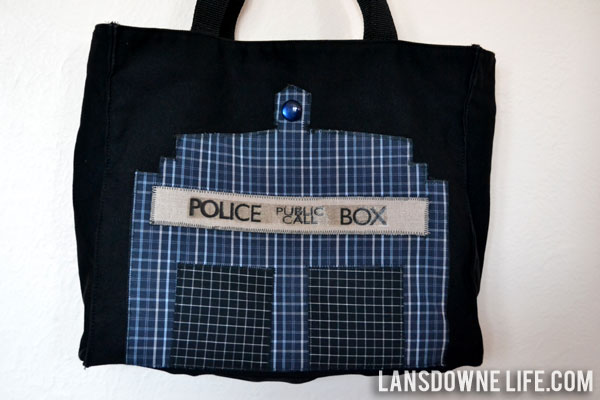
For the un-initiated, the TARDIS is the travelling time machine in the shape of an old school British Police Box from the geeky sci-fi show Dr. Who. We are fans.
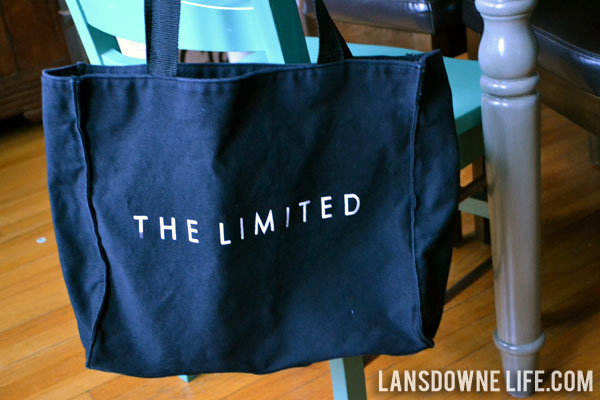
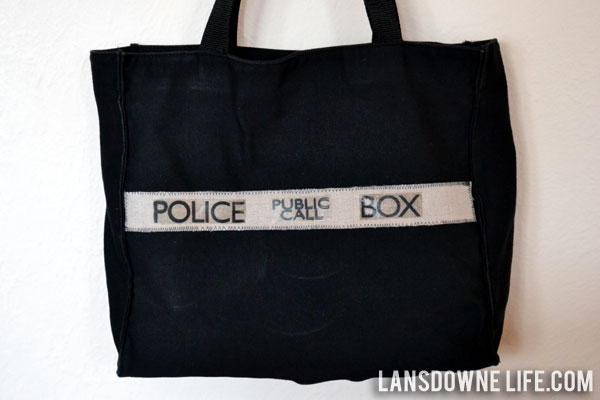
I went rummaging through my fabric stash, but came up short on “manly” fabrics. I was determined not to spend any money to make this and forced myself to work with what I already had in the house. Then I remembered I had a giveaway tote bag buried in a closet.
I’m not fond of sporting large logos, so it never saw much use. But the thing about logos like this is that you can cover them up. So with the bag already “done,” all I had to do was decorate it.
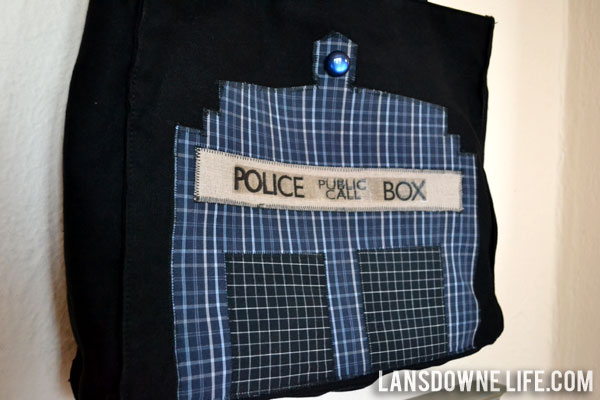
The TARDIS is tall and skinny, so I created a cropped design to ensure my logo was fully covered. I found a photo on the internet for reference on the general shape and dimensions, but in the end I sort of just sketched out the silhouette on my own. I tried my hardest not to make this bag look too cute, but it was hard. Tote bags by nature are not exactly masculine.
I created a giant applique with some blue plaid fabrics from a couple of Dan’s old dress shirts. (He busted through the elbows Incredible Hulk-style on three different shirts in like a month’s time. Weird but true.) Overall, the shirts themselves were in good condition (except for the sleeves, of course), so plenty of useable fabric.

I did a zig zag stitch around all the edges. I let go of the idea that this stitching had to be perfect, and I’m really happy I went ahead with it. The messy look goes with the design. I’m sure it would have been a lot easier to do on a single piece of flat fabric, rather than pushing and pulling the whole bag through the sewing machine.
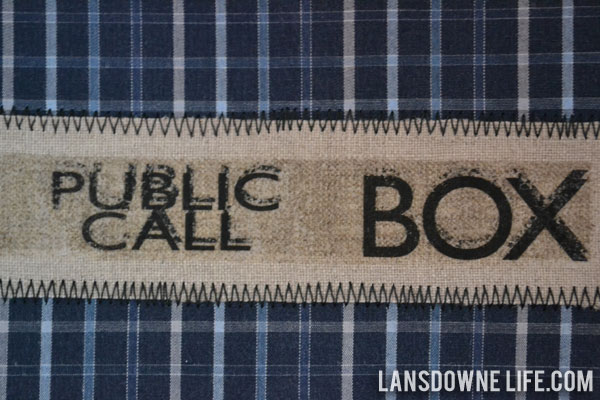
For the lettering, I used the font Gill Sans (the closest match I could find to the original) and printed it on iron-on transfer paper. I’ve worked with these plenty of times in the past with no issues, but this time, the iron-ons weren’t sticking and looked splotchy. I’m not sure what went wrong, maybe the transfers were old, maybe it was the linen fabric I used for the background, but things were not working well.
I had printed doubles of all the words (just in case something got screwed up… ha), so I decided to apply a second transfer on top of the first. I figured I couldn’t make it look any worse. I was a little bit off of the alignment, at first on accident and then on purpose. I think the double impression ended up looking great, though. Even better than if they had come out perfectly the first time.
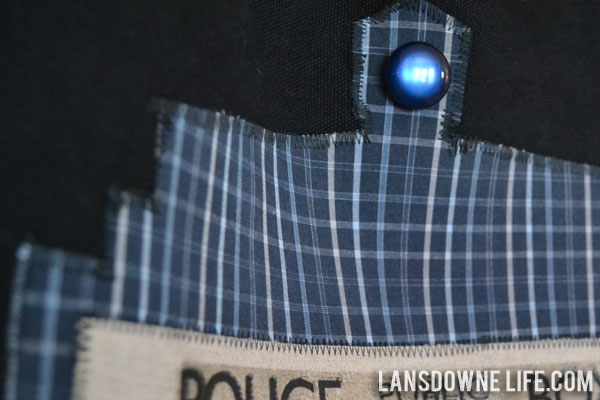
The TARDIS has a blue light on the top and I was lucky enough to find this old blue button in my button jar to represent that. It has a reflective quality that makes it look like it’s lighting up, which is kind of cool.
I hope Dan can tolerate the extra layer of geekiness added onto his library trips. He told me he was becoming more comfortable publicly embracing his geeky side, so I think he’ll be OK.
Are you sitting on a giveaway/logo-ed item that you’d rather not use as is? What are you waiting for? Give it a makeover!
See also:
Quick applique tutorial


It’s sad but I didn’t even realize the fabric came from those dress shirts. That makes it even better!
This does not surprise me.