
My husband has a lot of movies. Like, a lot. He’s been reviewing DVDs and Blu-rays for more than ten years, so he’s built quite a collection. If it were up to me, they’d all probably be in closed storage, but displaying them matters to him. He has granted me free reign over the design of the rest of the house pretty much, so it’s a compromise I’m willing to make.

But we didn’t have a great place to put them. Sure, we had this dinky DVD shelf better suited to a dorm room, but there were also some DVDs in our TV unit, in the storage ottoman and some in the basement. The collection was scattered and the lower shelves were at the fingertips of a certain nosy toddler. Time to do something about it.
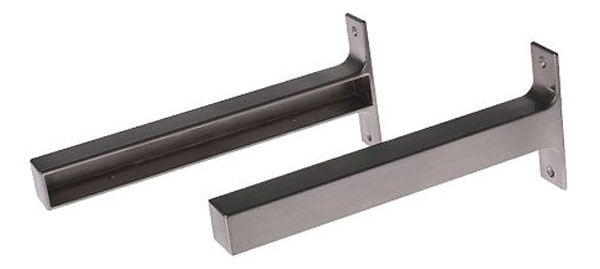
Image: IKEA
We made a roadtrip to the nearest IKEA a couple of months ago and picked up these brackets (EKBY BJÄRNUM). I know the design is very signature IKEA, but I still love them. (We already have some in Elise’s room.) I was all set to buy the shelves too, but the shallow eight-inch depth I wanted didn’t come in a long enough length. I didn’t need something super long, but I wanted to make use of every inch between the wall and the window frame.

So we went home with the brackets only and plans to transform plain lumber into the shelves.
I bought some 1″ x 8″ pine boards and had them cut to the right length in the store. After lightly sanding, I stained them with a couple of coats of an ebony stain and sealed them with a coat of water-based polyurethane.

After drying thoroughly, they were ready for hanging. And here’s where my troubles started.
I really don’t understand what the problem with this project was. It should have been easy. Measure, drill some holes, put in some screws, easy peasy. But it wasn’t. I struggled so much putting those screws into the studs. I threw away almost as many as I put in. I stripped most of the screw heads. I feel sorry for whoever has to take these down. (I do realize this person may be future Erin.)
Halfway through installation, I ditched my cordless drill in favor of a more powerful one borrowed from my dad, and that did help a lot. I think a lot of my difficulties had to do with the tight quarters I was working in (up against a wall on one side, trim on the other) and my lack of upper body strength behind the wimpy cordless drill.
I know this is the type of account that scares people away from tackling DIY projects, but I don’t want to pretend that every project around here goes smoothly. Anyway, they are done and sturdy in the studs as long as no one inspects too closely, everything will be fine.

Once the shelves were up, there was one more little thing to fix. The boards I used were not as thick as the shelves designed for the brackets. Being only 3/4″ thick, they didn’t quite fill the brackets like they should and were loose and shifty.

So I cut some pieces of flat trim I had and stained them to match the shelves. I was lucky I had the exact right thickness to fill the gap.

After they were dry, I inserted them into the brackets underneath the shelves. I initially planned on securing the brackets to the shelves with screws, but everything fit so perfectly and the shelves were tight in the brackets so I didn’t need to.

The shelves don’t protrude too far into the room; they actually take up less space than the old shelving unit did. A much cleaner and more structured display. And finally all of Dan’s DVDs and Blu-rays are in one room.

I’m not 100% done with the accessorizing, but I will have a post about a couple of the details later this week. Stay tuned!


love love love. They were worth the effort. I don’t think anyone (including future Erin) will ever want to take them down!
Thanks, Cori! I’m really happy with the way they turned out. And I’m so glad that rickety shelving unit is gone. I had Dan take it to Goodwill as soon as it left the room!
I love the finished look! I laughed when you said the shelf looked like something for a college dorm–I had one in my dorm room too!
Thanks, Kirsti! I would like to say that is the last piece of dorm-looking furniture in our house, but I don’t think it is…
12 months late on the question, but approx how many DVDs are up there?
Rough count says there are about 200 up there now. (The collection has grown a bit since these photos were taken.) A significant portion of them are seasons of TV shows that take up a lot more width than a standard DVD case, though.
I still wish they all fit in one location, but the TV unit is stuffed too. At least I can say they are all in one room.
Hey Erin,
Found this post while looking for real world examples of those brackets being used. I’ve installed a lot of shelving with and without brackets, with hang rails, etc. The actual footprint of those brackets seems pretty small. I was curious if the shelves flex any with those brackets installed? Do they feel pretty solid?
If so are all the screws actually in studs or did you use any anchors?
Those brackets are super strong and the shelves don’t flex at all. All of our screws are directly into the studs and we used really long screws. I don’t remember the size, but maybe 2-3 inches long.
I am not sure they would be as stable just using anchors in drywall, but maybe there are some crazy strong anchors out there. I would at least try to get one side of the shelf into a stud.
Hope that helps!