
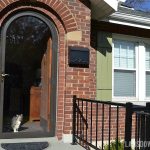
Our front door was in bad shape after years of neglect. The finish was completely flaking off, revealing the bare wood underneath.

See what I mean? Bad, bad. It was liable to give you bloody knuckles if you tried to knock.

After some initial indecision about whether to stain or paint, I started scoping out doors in our neighborhood and neighboring neighborhoods and noticed that my door with its natural wood finish seems to be in the minority, so I thought that was worth preserving.

Our front door is probably our exterior’s biggest asset, and I didn’t want to be the one to “spoil” it with paint. (Not right now anyway. We’ll see how the new finish holds up.)

The first step was sanding off the old finish, using a coarse 60 grit sandpaper and an electric sander. After about five minutes, this is what it looked like. See the two right panels? The exposed finish was just flaking off like nothing.

The whole sanding process produced so much more dust than I expected, so it’s good I had a dust mask. I probably should have also been wearing goggles, but they kept falling off. And with the dust mask, and some ear plugs and the goggles, I was feeling a bit too claustrophobic.

At this point, I figured it was time to remove the hardware. I took off the shiny brass kick plate. I expected to find some spider nests or water damage. And I did find a little bit of each.

But I was also astonished to find the previous finish had been protected under the kick plate. Crazy!

How long this door was neglected is anyone’s guess, but the difference between the finish and what it had become was a lot more drastic than I could have imagined.

The finish was perfectly protected behind Mr. Eagle Doorknocker as well.

Once everything was sanded (first with 60 grit, then with 220), it was time to address the rotting trim around the window. The stuff on the bottom of the circle was flaky and falling off.

But the top of the circle wasn’t really damaged at all. (Yeah, that’s what the bottom was supposed to look like.)

I carefully pried all of the trim off using a screwdriver and a pliers to pull out the nails.

The top was pretty secure; I had to drill some random holes so I could get my screwdriver under the trim.

I was scared to death I would break the stained glass window, but I took it slow and everything came off without a problem.

Here’s the door completely sanded and with trim removed from around the window. I couldn’t really sand off any more of the graying wood right above where the kick plate was.
Cleaner than it’s been in years. Still a little splotchy, but hey, this is an 81-year-old door I am dealing with. It’s not going to be perfect.

Almost ready for stain, but first a little wood filler on some deep cracks and gouges.

Then I used a wood conditioner. This is supposed to prepare the wood to accept the stain better. I’m not sure if it made a difference, but I figured the old wood needed all the help it could get.

I chose a gel stain in a medium brown called Cherrywood. I was afraid it was going to end up looking too reddish, but it turned out to be very similar to the swatch on the label.

One coat of stain, and this is where my big oversight of the project was revealed. The wood filler I used was only sandable/paintable, not stainable. I used stuff I already had on hand, so I didn’t bother reading the label. And it came back to bite me. After the first coat of stain was dry, I re-sanded all those areas taking off all the wood filler.

The second coat of stain covered all of my sanded areas without trouble and made the color of the whole door a little richer.

After two coats of stain, it was time to seal the door with three coats of polyurethane. Our front door faces south and gets full sun all day, so I was glad to see this mention that it protects against sunlight.

Ideally, I should have taken the door off the hinges to work on it, but I can’t really do that by myself, and waiting for someone to help me take it off was fueling my procrastination. And we sort of needed to be able to shut and lock the door at night!
This process was drawn-out, between the multiple coats of stain and sealer and all the drying time (8-10 hours for each coat of stain and 4 hours for each coat of polyurethane). There’s no way we could have functioned without a front door for several days.

After the door itself was finished, it was time to replace the trim around the window. I ordered this flexible molding online. It’s not real wood; it’s made of some sort of rubbery resin that won’t crack or rot.

Honestly, this was the step I was dreading the most in the whole process. I knew I had to use construction adhesive to adhere it to the door, but I wasn’t sure how I was going to hold the molding up while the glue was drying. It wasn’t really a clamp situation. It took me the longest time to figure it out, which is why the rest of the door was completely finished before I even started on the molding.

My solution was to put a single nail at the top of the circle (the installation instructions advised against using too many nails). This allowed me to work my way around the circle, gluing the trim in small sections.

I used painter’s tape to hold the molding in place until the glue set up. This method ended up working a lot better than I expected.

A couple of coats of stain and poly and it was looking a lot like real wood.

After attaching the hardware, the lengthy refinishing process was officially complete. This has been hanging over my head for a very long time; I’m so glad it’s done!

And because I’m crazy about a side-by-side before and after…


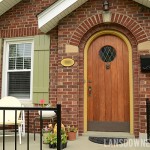


It’s so beautiful! You’ve inspired me–perhaps I’ll tackle my own vintage wood front door soon.
Great job!
Yes, yes, do it! I can’t say that it was easy or quick, but it’s rewarding to bring something so far gone back to life.
Wow!~I am super impressed!
Thanks, Katie!
I am really proud of you for tackling that job! Wow! How hard was it to get the single nail in the molding?
Thank you! It’s been a while since I worked on this, but I don’t remember the nail being a problem. That flexible molding is sort of rubbery like a pencil eraser, so it wasn’t too difficult.
I do remember being completely terrified hammering near that stained glass, though.
What a beautiful job. And a great tutorial.
Thanks!
This post is so helpful as I consider tackling my front double doors. I know it’s been some time since you posted it, but I’m curious about how the door is holding up. I’m especially interested in whether the spar finish is holding up against the sun and other weather that wears the wood down. Thanks!
Thanks for asking! I’ve been meaning to do an update post about the door. It’s been three years since I did it, and I am disappointed with how the finish has held up. The polyurethane is starting to crack and the color has faded some. It’s not as bad as the door I started with, but it’s on its way. After all the work I put in such a short time ago, it’s really disheartening.
If your door doesn’t face south, or if you have a roof or an overhang or something that protects your doors even a little, your results might be different.
I am planning on giving it a light sand and re-sealing it at some point with a different brand of polyurethane, though I’m not sure any of them are going to stand up to the sun we get on our porch.We are also going to try to find a storm door, but it’s an odd size/shape and I don’t know what is available.
Thanks so much for the quick reply! So sorry to hear the poly isn’t holding up well. I haven’t seen any articles/posts highlighting a good long term solution – marine spar finishes seem to be the best lead, but now I’m second guessing that. It’s crazy to have to invest so much time and energy every 3-4 years. Please post again if you find a better product. I’ve wanted to do something with my doors for a while, but need a good game plan first. Thanks again for the update!
Yes, I’ve read that about the marine finishes too, but I haven’t tried that. I wonder if it protects against sun damage, because that truly is the worst enemy in my situation. Have to research that!
It does seem crazy to have to refinish the door so often. I guess that’s why people go with paint instead? I refinished the door frame around the same time and painted that. Still looks great.
What did you do to the kickplate? It looks great.
Hi Julia,
I faux painted the kickplate to match the brass patina on the rest of the hardware. You can see it in this post:
https://www.lansdownelife.com/2011/06/how-to-faux-paint-brass-patina.html
I would love to know where you ordered the flexible trim from? I’m in a similar situation with our original 1920’s front door.
Hi Nicole,
Sorry it took me so long to respond. I was trying to track down the place I ordered it from.
I think I ordered from here: http://www.resinart.com/. I can’t find the email receipt from years ago, but this is the place that sounded most familiar to me.
Hope that helps!
Erin
Great, thanks for the info!